Sunday’s livestream went out in front of 62 live viewers. By the end of the service that number was zero. Not because the message was bad — because the stream kept pausing. Every minute or two it would buffer, hang, recover for a few seconds, then hang again. People stuck around for a while, then gave up. The full video did eventually upload as a complete archive after the service ended, so anyone who came back later could watch it. But the live experience, the part where the people on the couch feel like they’re part of the room, that was broken for a couple hundred minutes.
Same week, my remote VNC sessions into the streaming Mac had been dropping every minute or two for no obvious reason. The two symptoms turned out to have the same cause: the streaming Mac hadn’t been rebooted in 62 days, and macOS’s kernel network buffer pool was sitting at 97% utilization. When that pool fills, the OS silently drops or delays packets. Outbound RTMP to YouTube stalls. Inbound VNC stalls and reconnects. Every TCP flow that touches the host gets a little worse, and you don’t notice it building until it tips over on a Sunday morning.
netstat -m told the whole story:
8569/8819 mbufs in use
806/2424 mbuf 2KB clusters in use
15930 KB allocated to network (38.7% in use)
After a reboot:
141/420 mbufs in use
1/1568 mbuf 2KB clusters in use
7713 KB allocated to network (1.4% in use)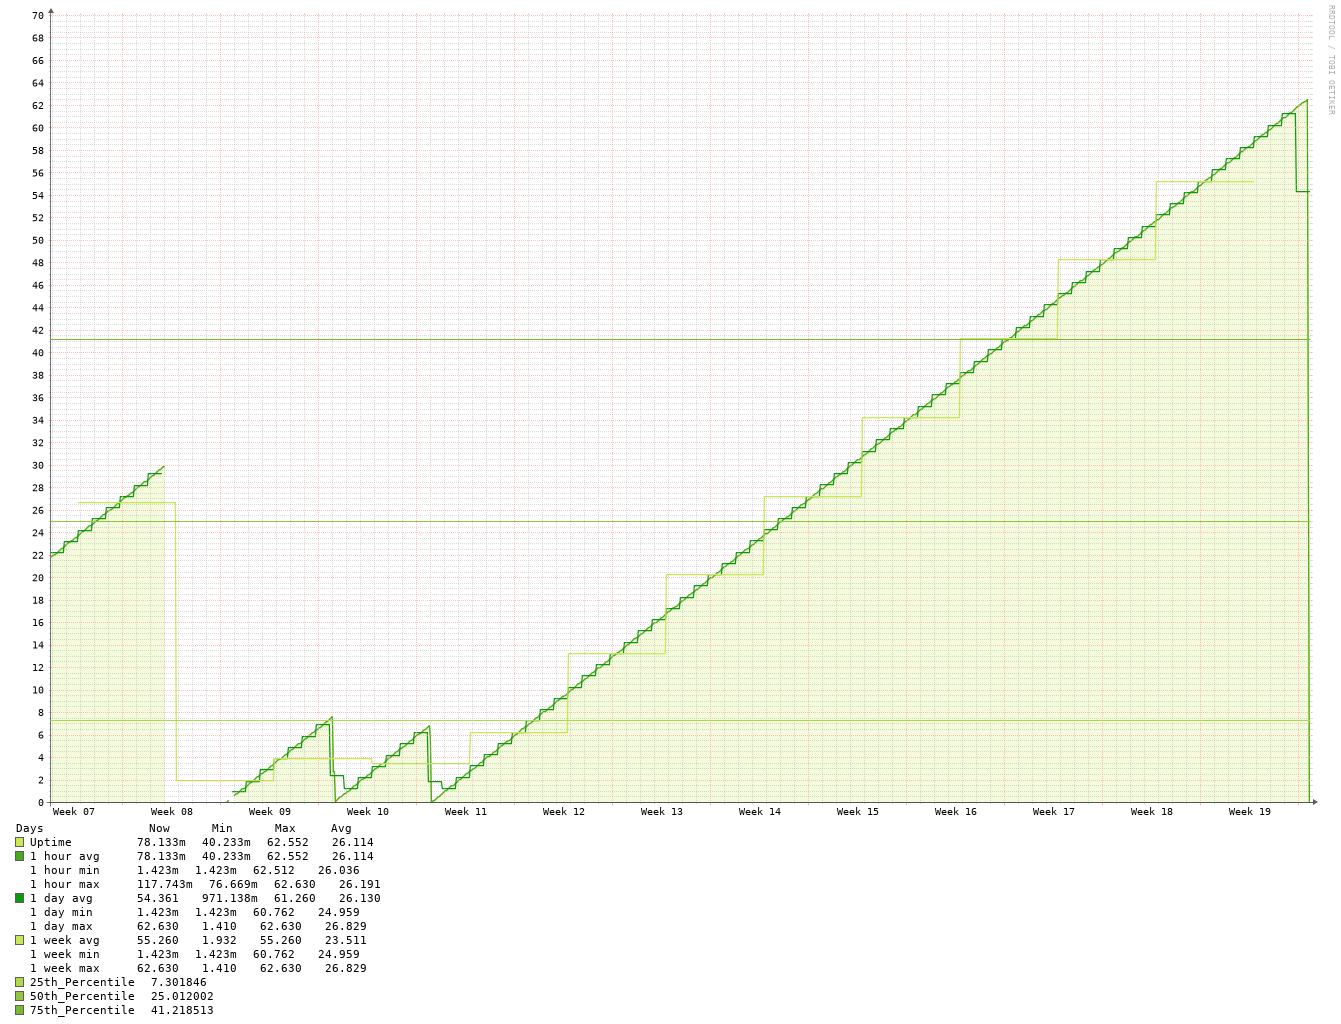
That was the fix. But “reboot once a week” is the kind of advice that’s easy to give and hard to follow when the machine is running ProPresenter or OBS — because both of those apps fight automated reboots in their own way.
Why weekly
In a production streaming setup the host typically:
- Holds open dozens of long-lived TCP connections (RTMP to YouTube, control to the switcher, ProPresenter network sync, NDI streams, web hooks).
- Reads a continuous stream of audio/video frames into memory.
- Talks to USB or Thunderbolt capture devices that allocate kernel buffers per stream.
- Auto-launches several apps on login (OBS, ProPresenter, Companion, browser tabs, monitoring dashboards).
Every one of those is a slow leak waiting to happen. Not because any single component is buggy — because the macOS network stack and the apps on top of it weren’t designed to run for two months without a break. Even Apple’s own laptops are quietly rebooted by macOS updates every few weeks. Production hosts don’t get those automatic restarts because we postpone updates.
The weekly reboot is a guardrail. It costs about a minute of downtime in the middle of the night and prevents an entire category of “why is the stream lagging?” debugging the next Sunday — the kind that costs you all of your viewers.
The macOS scheduler isn’t enough
The first thing you’d try is pmset:
sudo pmset repeat restart T 02:00:00That works for a plain Mac. On a Mac running OBS or ProPresenter, it doesn’t:
- ProPresenter shows a modal “Are you sure you want to quit ProPresenter?” dialog the moment macOS asks it to quit. The reboot stalls indefinitely waiting for someone to click OK. Next Sunday morning the volunteers find the same machine they left, still running, still leaking buffers.
- OBS doesn’t block the reboot, but it doesn’t get the chance to write its state file either. On next launch it pops the “OBS was not cleanly shut down” warning. Worse, scene state and recording paths can be lost.
Both apps expose extensive WebSocket / REST APIs (Bitfocus Companion uses them for show control). Neither API has a “quit the app” endpoint — confirmed against ProPresenter’s OpenAPI spec and obs-websocket v5’s protocol document. That’s a deliberate choice; you don’t want random show control plugins killing your production app mid-service.
The script that actually works
So we replaced pmset with a LaunchDaemon that runs a small bash script with per-app handling. Each app needs a slightly different mechanism:
- OBS honors a polite AppleScript
quit saving nowhen sent into the user’s Aqua session. It writes its state file cleanly and exits in about five seconds. We verified by checking that thesafe_modeflag file does not appear on next boot and the final OBS log ends with a complete profiler summary. - ProPresenter ignores the AppleScript
saving noparameter and always pops its confirmation dialog. You can programmatically click OK on the dialog via System Events, but that requires granting Accessibility permission to/bin/bash, which is way too broad a grant for a single weekly task. A plainSIGTERMviakillallcleanly terminates ProPresenter without triggering the dialog at all — that turns out to be the right tool.
SIGTERM is the standard Unix way to ask a process to terminate. Well-behaved Mac apps respond by saving state through the normal AppKit termination path. The confirmation dialog only appears on the macOS-initiated “polite shutdown” Apple Event, not on a direct signal. ProPresenter happens to handle SIGTERM cleanly; OBS doesn’t (it would lose state), which is why each app gets its own mechanism.
Here’s the script (lives at /Library/Scripts/jesse-lee/weekly-reboot.sh, mode 755, owned by root:wheel):
#!/bin/bash
set -u
exec >> /var/log/weekly-reboot.log 2>&1
echo "[$(date)] starting weekly reboot"

USER_UID=$(id -u worshipmedia 2>/dev/null)

wait_exit() {
    local app="$1"; local secs="$2"; local i
    for i in $(seq 1 "$secs"); do
        pgrep -x "$app" > /dev/null || return 0
        sleep 1
    done
    return 1
}

user_osa() {
    /bin/launchctl asuser "$USER_UID" /usr/bin/osascript "$@" >/dev/null 2>&1
}

quit_obs() {
    pgrep -x OBS > /dev/null || return 0
    echo "[$(date)] OBS: AppleScript quit"
    user_osa -e 'tell application "OBS" to quit saving no' &
    local p=$!
    wait_exit OBS 10
    kill "$p" 2>/dev/null
    if pgrep -x OBS > /dev/null; then
        echo "[$(date)] OBS: SIGTERM"
        /usr/bin/killall OBS 2>/dev/null
        wait_exit OBS 10
    fi
    pgrep -x OBS > /dev/null && /usr/bin/killall -9 OBS 2>/dev/null
}

quit_propresenter() {
    pgrep -x ProPresenter > /dev/null || return 0
    echo "[$(date)] ProPresenter: SIGTERM"
    /usr/bin/killall ProPresenter 2>/dev/null
    wait_exit ProPresenter 10
    pgrep -x ProPresenter > /dev/null && /usr/bin/killall -9 ProPresenter 2>/dev/null
}

quit_obs
quit_propresenter
/usr/bin/killall -9 "ProPresenter Helper (Workspaces)" 2>/dev/null
/usr/bin/killall -9 "ProPresenter Helper (Snapshots)" 2>/dev/null

sleep 3
echo "[$(date)] calling shutdown -r now"
/sbin/shutdown -r now
The LaunchDaemon plist (/Library/LaunchDaemons/com.example.weekly-reboot.plist) wraps it on a weekly schedule:
<?xml version="1.0" encoding="UTF-8"?>
<!DOCTYPE plist PUBLIC "-//Apple//DTD PLIST 1.0//EN" "http://www.apple.com/DTDs/PropertyList-1.0.dtd">
<plist version="1.0">
<dict>
    <key>Label</key>
    <string>com.example.weekly-reboot</string>
    <key>ProgramArguments</key>
    <array>
        <string>/Library/Scripts/jesse-lee/weekly-reboot.sh</string>
    </array>
    <key>StartCalendarInterval</key>
    <dict>
        <key>Weekday</key>
        <integer>2</integer>
        <key>Hour</key>
        <integer>2</integer>
        <key>Minute</key>
        <integer>0</integer>
    </dict>
    <key>StandardOutPath</key>
    <string>/var/log/weekly-reboot.log</string>
    <key>StandardErrorPath</key>
    <string>/var/log/weekly-reboot.log</string>
</dict>
</plist>
Load it with sudo launchctl bootstrap system /Library/LaunchDaemons/com.example.weekly-reboot.plist. Test it (this will reboot the Mac) with sudo launchctl kickstart -k system/com.example.weekly-reboot. Check /var/log/weekly-reboot.log afterwards to confirm which path each app took.
Stagger the rest of the network
One streaming Mac doesn’t live alone. If you reboot it during a window where the network monitoring system is also being rebooted, or your DNS server cycles right when OBS comes back and tries to resolve YouTube’s RTMP endpoint, you’ve created a different problem.
We stagger every host that needs a weekly reboot inside a single Tuesday 02:00–04:00 maintenance window:
- 02:00 — streaming Mac (OBS)
- 02:15 — sanctuary Mac (ProPresenter)
- 02:30 — primary DNS server
- 02:45 — secondary DNS server
- 02:55 — primary application host (apt-upgrade + reboot)
DNS master comes back before the secondaries cycle. The application host (which also runs a DNS secondary, the network monitoring system, and a few other things) goes last so it has working DNS when it restarts. IP cameras and wireless APs have their own per-device weekly reboot timers set to fall inside the same window. The monitoring system has a maintenance schedule configured to suppress alerts during 02:00–04:00 Tuesday so the reboot cycle doesn’t page anyone.
What I’d tell past-me
Uptime is not a virtue. “My streaming Mac has been up for 62 days” is the kind of thing systems people brag about, and on a production host it’s actually a smell. Whatever subtle resource leak any of your apps has, it’s accumulating. The streamer who reboots their box every Tuesday at 2am does not know what an mbuf is, and they don’t have to.
Set up the LaunchDaemon. Stagger your other hosts inside the same window. Tell your monitoring system to keep quiet during the window. Check the log file occasionally. Then forget about it. Your viewers will stay through the whole service.